Overview
Welcome to your new Tax Organizer! This comprehensive guide walks you through completing your tax organizer in your Client Portal. The Tax Organizer helps you provide all the necessary information for your tax return preparation in an organized, step-by-step process.
Quick Links
Prefer to watch? See a complete walkthrough of the Tax Organizer experience: click here to watch Client Tax Organizer Experience
How This Guide Relates to the Client Portal
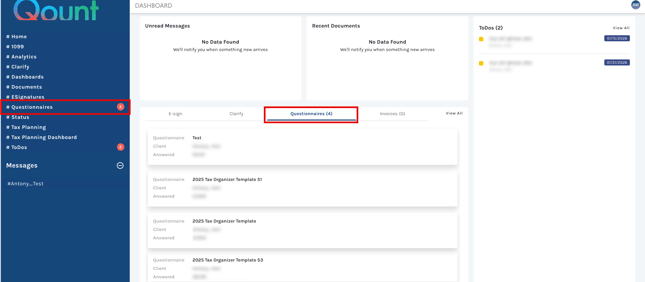
The Tax Organizer is one of the primary features of the Client Portal and typically appears as “Questionnaires” in the left sidebar menu or via the Questionnaires tab on the dashboard. During tax season, it becomes the most important tool for you to provide your tax information to your accounting firm.
What Is the Tax Organizer?
The Tax Organizer is a digital questionnaire that collects your tax information for the current tax year. It includes:
-
Personal and contact information
-
Income sources and documentation
-
Deductions and credits
-
Prior year information for comparison
-
Document upload capabilities
-
Communication tools with your tax preparer
The organizer saves your progress automatically, allowing you to complete it at your own pace and return to it as needed.
Accessing Your Tax Organizer
When your accounting firm sends you a tax organizer, you'll receive an email notification customized by your firm.
Note: Your firm may have enabled "Secure Link" for direct access, but you won't know this from the email itself. If your email includes a direct link to open the organizer, simply click it. Otherwise, log in to your Client Portal as usual.
Tax Organizer Overview Page
When you click to open your Tax Organizer you'll first see an overview page that provides a complete picture of your progress and what needs attention.
Welcome Section
The overview page begins with a welcome message explaining the questionnaire process. Below this, you’ll find several status sections:
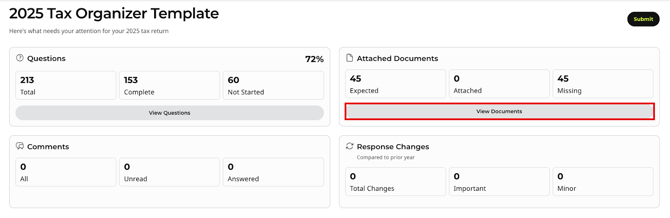
Progress Tracking
The overview displays real-time statistics about your organizer: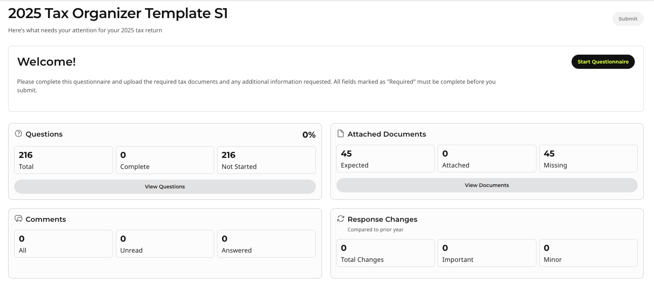
Questions Section
-
Total Questions – Shows the total number of questions in your organizer (e.g., 191 total)
-
Complete – Number of questions you've answered
-
Not Started – Questions you haven't yet viewed
Attached Documents
-
Expected – Documents your firm expects based on your answers
-
Attached – Documents you've already uploaded
-
Missing – Documents still needed
Comments (coming soon)
Response Changes (coming soon)
Questionnaire Structure
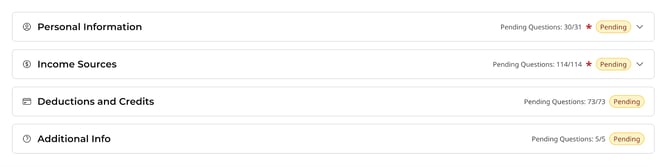
The overview page shows the complete structure of your organizer, organized into main sections:
- Personal Information – Personal and contact information
- Income Sources – Wages, Banks and Brokerages, Business, Rental, etc.
- Deductions and Credits – Itemized deductions and tax credits
- Additional Info – Other tax-related questions
Each section can be expanded to show its subsections and current completion status.
Navigating the Organizer
Starting Your Organizer
Click the "Start Questionnaire" button to begin. The organizer guides you through each section systematically.

Navigation Flow
The organizer is divided into multiple sections that guide clients through the tax questionnaire experience. Some sections may include prior-year information for reference, while others may not, depending on the organizer configuration.
Navigation Controls
- Previous Button – Return to the previous question or section
- Next Button – Move to the next question (saves your current answer automatically)
- Section Menu – Jump to specific sections from the sidebar
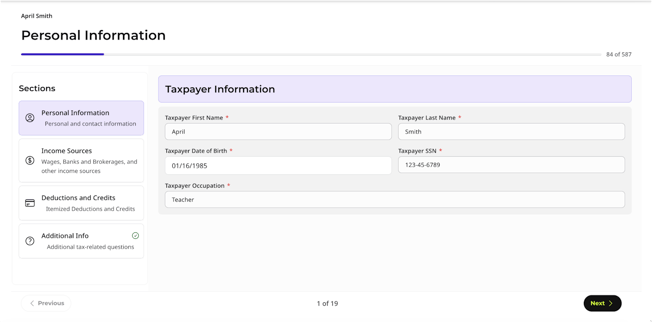
Tip: Your answers are automatically saved as you progress.
Types of Content in the Organizer
Prior Year Information
When you have prior year data on file, the organizer displays this information for your review and confirmation.
For example, in the Taxpayer Information section, you'll see:
-
Your name and contact details from last year
-
Spouse information (if applicable)
-
Dependent information (if applicable)
-
Options to confirm, update, or add new information
Special Sections: Repeatable Sections
For taxpayers with business income, the organizer includes special repeatable sections: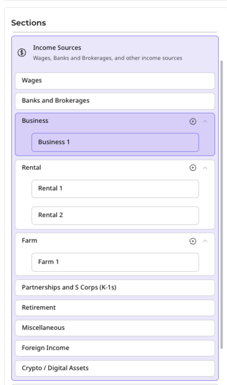
-
Business Income – Add multiple businesses
-
Rental Properties – Add multiple rental properties
-
Farm Income – Add multiple farm operations
To add a new business or property:
- Click "Add Business" (or appropriate category)

- Complete all questions for that business
- Add another if needed or continue to next section
Note: These sections appear even if you had no businesses in the prior year, allowing you to add new business activities. If you have multiple businesses (for example, 5 different businesses), you will need to add each one individually using the "Add Business" button for each.
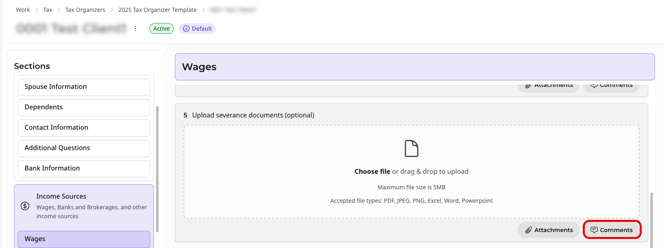
Working with Documents
Uploading Documents
There are two ways to upload documents:
-
Drag and Drop – Drag files directly from your computer onto document upload areas
-
Choose File – Click the upload area and select files from your device using the file browser
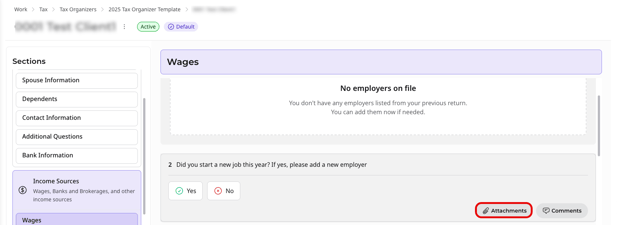
Attachment Options
Documents can be attached in two ways:
-
General document uploads in designated upload sections

-
Question-level attachments – Some questions have an "Attachments" option that lets you attach relevant documents directly to specific questions
File Requirements
-
Maximum file size: 5MB per file
-
Accepted formats: PDF, JPEG, PNG, Excel, Word, PowerPoint
Communicating with Your Firm
Comments on Questions
Throughout the organizer, you'll find a "Comments" option on individual questions. Use this feature to:
-
Ask clarifying questions about specific items
-
Flag concerns or uncertainties
-
Provide additional context for your answers
-
Request assistance from your accounting firm
Your firm will see these comments and can respond to help you complete the organizer accurately.
Document Review
The Document Review page provides a centralized location to manage all documents required for your tax organizer. You can access this page by clicking the "View Documents" button in the Attached Documents section of your Tax Organizer Overview.
For a step-by-step demonstration of the Document Review process, including uploading, managing, and downloading documents, please watch: Client Document Review Walkthrough
Understanding the Document Review Interface
The Document Review page organizes all your document requirements in one place, making it easy to see what's been uploaded and what's missing.
Document Categories
Documents are organized into the same main sections as your questionnaire:
-
Personal Details
-
Income Sources
-
Deductions & Credits
-
Additional Info

Each category can be expanded or collapsed by clicking on it. Within each category, you'll see individual document requests organized by type.
Expand, Collapse, and Download Options
At the top of the page, you’ll find the following actions:
-
Expand All – Expands all document categories so you can view all required and uploaded documents at once.
-
Collapse All – Collapses all document categories to provide a cleaner and more compact view.
-
Download All – Downloads all uploaded documents in a single .zip file.

Document Status Indicators
Missing Documents
Documents marked as "Missing" are required based on your questionnaire answers. These appear with:
-
Document name (e.g., "W-2", "1099-R")
-
Paper clip for uploading
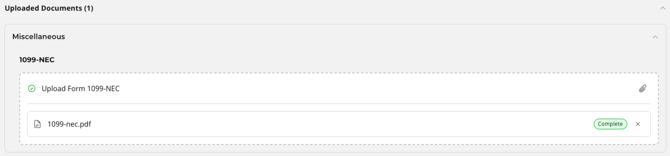
Uploaded Documents
Successfully uploaded documents appear with:
-
Marked as complete
-
Document name (e.g., "Wage")
-
File name of the uploaded
-
X button to remove the document
Uploading Documents
There are two ways to upload documents in Document Review:
Method 1: Direct Upload from Document List
-
Locate the document request in the appropriate category
-
Click the paper clip icon next to the document name

-
Select your file using the file browser
-
The document will be uploaded and marked as complete
Method 2: Drag and Drop
-
Drag files directly from your computer onto specific document slots
-
Drop the file when you see the upload indicator

-
The document will be uploaded automatically
Submitting Your Organizer
Submission Requirements
Before you can submit your organizer, you must:
-
Complete all required questions (marked with red asterisks)
-
Upload all required documents
-
Address any required clarifications
Review Before Submission
When you click "Submit" at the end of the organizer, the system performs a final check.
Depending on how your questionnaire has been completed, you may see one of the following confirmation messages:
Confirmation Message Option 1
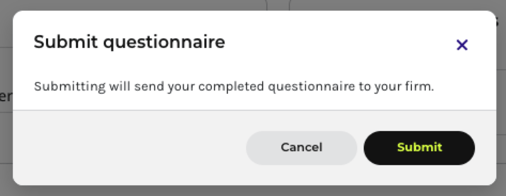
Options:
-
Cancel – Return to the organizer
-
Submit – Confirm and send your organizer
Confirmation Message Option 2
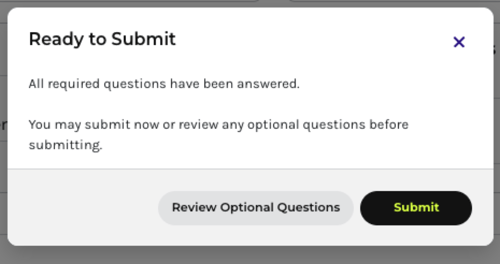
Options:
-
Review Optional Questions – Return to review optional items
-
Submit – Proceed with submission
Both messages serve as confirmation before sending your organizer to your firm. The version displayed depends on the completion status of required and optional questions.
Successful Submission
Upon clicking Submit, you will see a success message confirming that your questionnaire has been submitted successfully. Your accounting firm is notified of the submission and can begin reviewing your responses.
Note: You may be able to click Submit again even after a successful submission. If you have already received the success confirmation, there is no need to submit again.
After Submission
After submitting your organizer, you will be returned to the questionnaire screen. Your organizer status will show as "Received," confirming that your firm has been notified. You can still access the organizer to review your responses and submitted documents.
If you need to make changes after submission, contact your accounting firm directly or use the Comments feature within the organizer to let them know what needs to be updated.
Conclusion
Completing your tax organizer is an important step in ensuring accurate and timely tax preparation. By following this guide, you can:
-
Provide complete and organized information to your firm
-
Upload all necessary documents efficiently
-
Communicate clearly about any questions or concerns
-
Track your progress throughout the process
If you encounter any difficulties or have questions not covered in this guide, don't hesitate to reach out to your accounting firm using the Comments feature or by contacting them directly.
Thank you for using the Qount Client Portal to complete your tax organizer!