
Your accounting firm has sent you a Tax Questionnaire through the Qount Client Portal. This is a guided digital form that collects the information your firm needs to prepare your tax return.
The questionnaire saves your progress automatically as you go — you can start, pause, and come back any time before submitting.
What you'll do in the questionnaire:
- Review and confirm your information from last year (where applicable)
- Answer questions about your income, deductions, and any changes from last year
- Upload supporting documents such as W-2s, 1099s, and receipts
- Leave comments for your firm on any question you have questions about
- Submit when everything is complete
Quick Links
1. How to Open Your Questionnaire
When your firm sends you a questionnaire, you'll receive an email notification. There are two ways to open it:
Option A — Open directly from the email
If your firm has enabled Secure Link, your email will include a button or link that opens the questionnaire directly — no login required.
Step 1 Open the email from your accounting firm.
Step 2 Click the link or button to open your questionnaire.
Step 3 If prompted, enter the 6-digit verification code sent to your email or phone. This is a one-time security step.
Not all firms use this setting. If your email doesn't include a direct link, use Option B below.
Tip The 6-digit verification code (MFA) is an extra security step your firm may have turned on to protect your personal tax information. Enter the code when prompted and you'll be taken straight into your questionnaire.
Option B — Log in to the Client Portal
Step 1 Log in to the Qount Client Portal at your firm's portal link.
Step 2 In the left sidebar, click Questionnaires.
Step 3 Find your questionnaire in the list and click it to open.
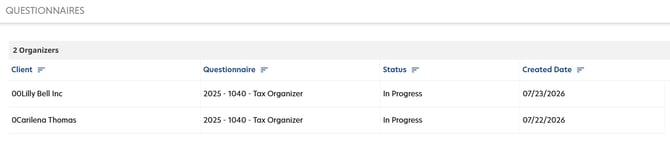
Note If you have multiple questionnaires (e.g., for different tax years), they will all appear in this list. Make sure you open the correct one for the current tax year.
2. The Overview Screen
The first thing you see when you open your questionnaire is the Overview screen. This is your home base — it shows your progress and gives you access to all sections of the questionnaire.
Progress Summary
At the top of the Overview screen, you'll see two summary cards:
|
Card |
What It Shows |
|
Documents |
How many documents are expected, how many you've uploaded, and how many are still missing. Click View Documents to manage all your documents in one place. |
|
Comments |
Any questions in your questionnaire that have comments from you or your firm. Click View Comments to see all comments at once. |
Tip Click "View Documents" or "View Comments" from the Overview screen to jump directly to those screens. You don't have to complete sections in order.
Sections and Sub-sections
Below the summary cards, the Overview screen lists all the main sections of your questionnaire — for example, Personal Information, Income Sources, Deductions & Credits, and Additional Info.
Each section shows a progress count for required questions:
- E.g. 5/5 means all 5 required questions are done
- E.g. 3/10 means 3 of 10 required questions are done
- E.g. 0/8 means you haven't started yet
- If a section has no required questions, it shows "No required questions"
Clicking any section or sub-section on the Overview screen takes you directly to that part of the questionnaire.
Note A ✓ checkmark appears next to a sub-section when all its required questions are answered.
When all sub-sections in a section are complete, the main section also gets a ✓ checkmark.
Use these checkmarks to track what's done at a glance.
Starting the Questionnaire
When you're ready to begin, click the Start Questionnaire button on the Overview screen. This takes you into the first section.
Tip You don't have to complete the questionnaire in one sitting. Your answers are saved automatically each time you click Next. Come back any time and pick up where you left off.
3. Navigating Sections and Questions
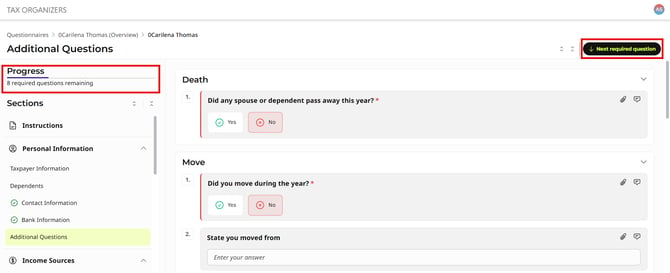
The Left Sidebar
Once you're inside the questionnaire, the left sidebar shows all the sections in order along with a progress bar. The progress bar counts required questions only — optional questions are not included.
You can collapse or expand the sidebar:
- Collapsed view — shows section names only, giving you more reading space
- Expanded view — shows sections and their sub-sections, so you can jump to a specific sub-section directly
Tip Click any section or sub-section name in the sidebar to jump directly to it — you don't have to go through each section in order.
"Next Required Question" Button
At the top right of every section and sub-section, a button helps you move through the questionnaire efficiently:
When there are unanswered required questions in the current section or sub-section, the button reads Next Required Question. Click it to jump directly to the next unanswered required question.
When all required questions in the section or sub-section are complete, the button updates to Go To Next Section.
Moving Between Questions
|
Control |
What It Does |
|
Next |
Saves your current answer and moves to the next question or section. |
|
Previous |
Goes back to the previous question or section. |
|
Section sidebar |
Click any section or sub-section to jump to it directly. |
|
Overview screen |
Click a section from the Overview screen to jump to it. |
Tip Your answers save automatically every time you click Next. You do not need to save manually.
Section Completion Pop-up
When you've answered all the required questions in a section, a pop-up message appears:
- "Review optional questions" — stays on the same page so you can review and answer any optional questions in this section
- "Go to next section" — takes you directly to the next section
Optional questions are not required to submit your questionnaire — but answering them helps your firm prepare the most complete return possible.
4. Answering Questions
Required vs. Optional Questions
Your questionnaire includes two types of questions:
|
Type |
How to Identify |
|
Required |
Marked with a red asterisk (*) next to the question, and a vertical red line on the left side of the question. |
|
Optional |
No asterisk or red line. Answer if the question is relevant to your situation. |
Important You must answer all required questions before you can submit your questionnaire.
If a question has a required document attachment, you'll see a red attachment icon at the top-right corner of the question — you must upload a file to complete that question.

Prior-Year Information
If your firm has your information from last year on file, some fields will already be filled in with your prior-year data.
For each pre-filled answer:
- Review the information to make sure it's still correct
- Update it if anything has changed (e.g., a new address, new employer)
- Leave it as-is if nothing has changed
Note When you change a pre-filled answer, the field turns yellow. This helps your firm quickly see what's different from last year when they review your submission.
Repeatable Sections
For taxpayers with multiple businesses, rental properties, or farm operations, some sections let you add more than one entry.
For example, the Business Income section lets you add each business separately. Click the Add button (e.g., "Add Business") to add another entry, and complete all the questions for that business before adding the next one.
- Business Income (Schedule C)
- Rental Properties (Schedule E)
- Farm Income (Schedule F)
- Dependents
Note These sections appear even if you had no entries last year — so you can add new businesses, properties, or dependents for the current tax year.

5. Uploading Documents
Many questions require you to upload supporting documents — such as W-2s, 1099s, mortgage statements, or charitable donation receipts. There are two ways to attach documents in your questionnaire.
Method 1 — Upload at a Question
Some questions include an attachment option at the top-right corner of the question. Look for the attachment (📎) icon there. Click it to attach a relevant document to that specific question.
Important If the attachment icon is red, uploading a document for that question is required.
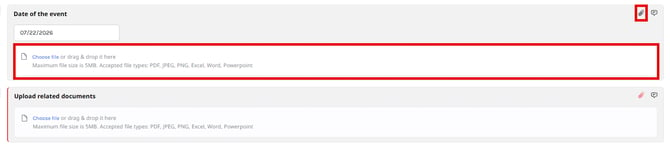
Method 2 — Upload in Document Review
The Document Review page shows all required and uploaded documents in one place, organized by section. You can upload missing documents here without having to navigate back to each individual question.
🔗 See Section 7: Document Review for full details on this page.
Drag and Drop
In both places, you can drag files directly from your computer and drop them onto the upload area instead of using the file browser.
File Requirements
|
Requirement |
Detail |
|
Maximum file size |
5 MB per file |
|
Accepted formats |
PDF, JPEG, PNG, Excel (.xlsx), Word (.docx), PowerPoint (.pptx) |
Tip If your file is larger than 5 MB, try scanning at a lower resolution, or ask your firm if there's another way to share the document.
6. Leaving Comments
Every question in your questionnaire has a Comments option. Use it to communicate directly with your tax preparer — without having to send a separate email.
When to Use Comments
- You're unsure how to answer a question
- You want to flag something that needs your firm's attention
- You need to provide extra context that doesn't fit in the answer field
- You want to ask a clarifying question about a specific item
How to Leave a Comment
Step 1 Find the question you want to comment on.
Step 2 Click the Comments icon (speech bubble) at the top-right corner of the question.
Step 3 Type your comment and press Send.
Your firm will be notified and can respond directly in the same thread.

Note A filled bubble icon next to a question means there is already a comment on that question (from you or your firm).
7. Document Review
The Document Review page gives you a complete view of all documents required for your questionnaire — what's been uploaded and what's still missing — organized by section.
How to get there: On the Overview screen, click "View Documents" in the Documents card.
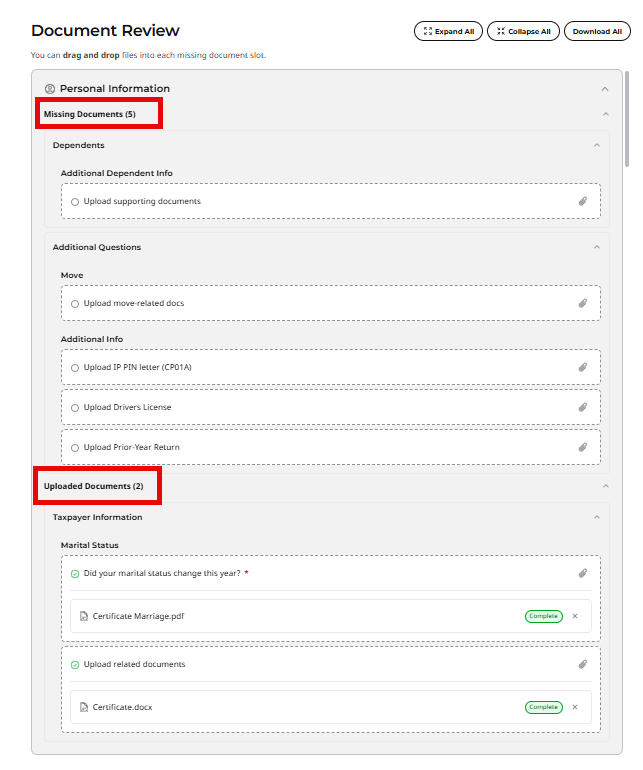
What You'll See
Documents are organized into the same sections as your questionnaire: Personal Information, Income Sources, Deductions & Credits, and Additional Info.
Each document entry shows one of two states:
|
Status |
What It Means |
|
Missing |
The document is required based on your answers but hasn't been uploaded yet. Click the 📎 icon next to the document name to upload it. |
|
Uploaded ✓ |
The document has been received. You'll see the file name and an option to remove it. |
Actions on This Page
- Expand All / Collapse All — show or hide all document categories at once
- Download All — downloads all your uploaded documents as a single .zip file
- Upload a document — click the 📎 icon next to any missing document, or drag and drop the file onto that slot
- Remove a document — click the X button next to an uploaded file to remove it and upload a replacement
Note Uploading documents in Document Review is equivalent to uploading at the question level — the same document will appear as attached when your firm reviews your answers.
8. Submitting Your Questionnaire
When you've answered all required questions and uploaded all required documents, you're ready to submit.
Where to Find the Submit Button
The Submit button appears in two places:
- On the Overview screen — available once all required sections are complete
- At the end of the last section — appears after you've gone through the entire questionnaire
Important The Submit button only becomes active when all required questions are answered. If it is greyed out, check the Overview screen for any sections still showing outstanding required questions.
Before You Submit
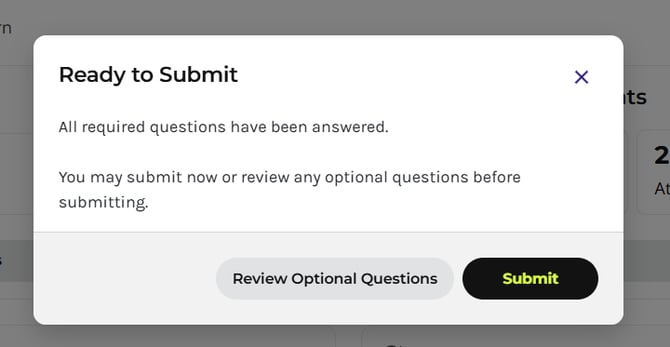
When you click Submit, the system performs a final check and shows a confirmation message. You may see one of two versions:
|
Confirmation Message |
What It Means |
|
Option 1 — Submit confirmation |
All required questions are complete. You can cancel to review more, or submit immediately. |
|
Option 2 — Optional questions remaining |
Required questions are done, but some optional questions haven't been answered. You can review them first, or submit as-is. |
After Submission
Once you click Submit:
- You'll see a success confirmation message.
- Your accounting firm is notified immediately.
- Your questionnaire status changes to "Received."
- You can still open the questionnaire to review your answers and documents.
Note If you need to make changes after submitting, contact your accounting firm directly, or use the Comments feature on the relevant question to let them know.
Do not click Submit again after receiving the success confirmation — your answers have already been sent.

9. Frequently Asked Questions
I received an email from my firm but there's no link in it. What do I do?
Log in to the Qount Client Portal and navigate to Questionnaires in the left sidebar. Your questionnaire will appear there. If you don't see it, contact your accounting firm to confirm it has been sent.
The 6-digit code isn't working. What should I do?
Codes expire after a few minutes. Click "Resend Code" to get a new one, and enter it promptly. If the issue continues, contact your accounting firm.
I accidentally left the questionnaire — will I lose my answers?
No. Your answers are saved automatically every time you click Next. When you come back, everything will be exactly where you left off.
Some of my answers are already filled in. Do I need to re-enter them?
No — these are pre-filled from your prior-year information (shown with a PY label). Just review them and update anything that has changed. If nothing has changed, leave them as-is.
A field I updated has turned yellow. Is something wrong?
No, that's expected. Yellow highlighting means you've changed a pre-filled answer from last year. It helps your firm spot what's different from prior year when reviewing your submission.
Can I submit without answering optional questions?
Yes. Only required questions (marked with a red asterisk *) must be answered before you can submit. Optional questions are encouraged but not mandatory.
I can't find a section I'm looking for.
Try using the expanded sidebar view — click the expand icon on the left sidebar to see all sections and sub-sections. You can also click any section from the Overview screen to jump directly to it.
My document is larger than 5 MB. What should I do?
Try scanning at a lower resolution or compressing the file before uploading. If you're still having trouble, leave a comment on the relevant question and let your firm know — they can advise on alternative ways to share the document.
I submitted but now I need to make a change.
Contact your accounting firm directly, or use the Comments feature on the specific question to let them know what needs to change. Your firm can unlock the questionnaire for further edits if needed.
I can't see the Submit button, or it's greyed out.
The Submit button only becomes active when all required questions are answered and all required documents are uploaded. Go to the Overview screen and look for any sections that show outstanding required questions (counts that aren't complete, e.g., 2/5).
Need More Help?
If you run into anything not covered in this guide, the best place to start is the Comments feature — leave a comment on the question you're unsure about and your accounting firm will respond.
You can also contact your firm directly by phone or email.