
From time to time, your accounting firm may need documents, information, or confirmations from you — for example, a bank statement, an answer to a question about your business, or a signature on a form. Instead of email attachments and back-and-forth messages, your firm sends these requests as a To-Do inside your Client Portal.
This guide explains everything you need to know to find a To-Do, understand what it's asking for, complete it, and submit it back to your firm.
Quick Video Walkthrough
Before diving into the detailed steps below, watch this short video for a quick walkthrough.
Note: Screens and labels in the video may vary slightly from the current experience as we continue to refine the interface. The overall functionality and steps remain the same.
Quick Navigation
1. Accessing Your To-dos
Every To-do your firm sends you appears on your dashboard, the home screen of your Client Portal.
Each To-do in the list shows its title, a short description, and its due date. Click any To-Do to open it and see the full details.
Note: A To-do only appears on your dashboard once your firm has sent it to you. When your firm sends you a new To-do, it will also appear on your portal dashboard, and you'll receive an email notification. If your firm mentioned a request you can't find, it may still be in preparation on their end — reach out to your firm directly to confirm.
2. Understanding a To-do
Opening a To-do shows everything related to that one request in a two-panel layout.
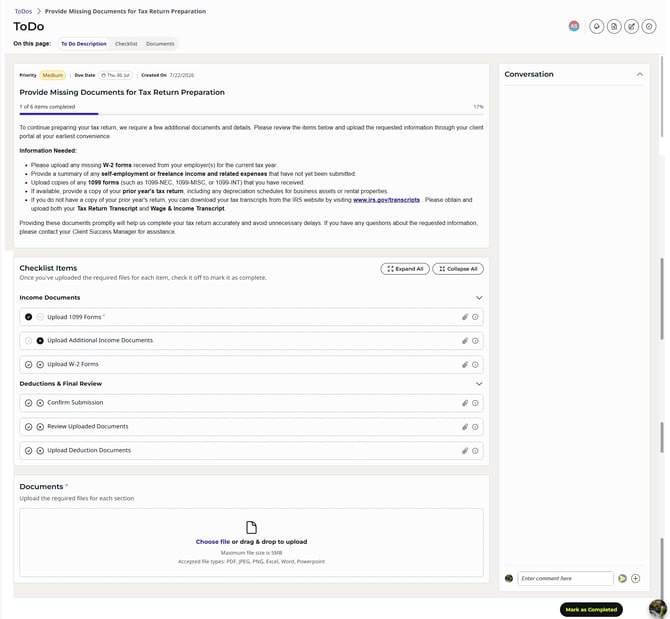
Left panel: contains the To-do description, checklist items, and document upload area (if your firm has enabled it). Quick-scroll links at the top of the panel: Description, Checklist, Documents, let you jump straight to any section without scrolling through the whole page.
Right panel: The Conversation thread between you and your firm.
|
Section |
What It's For |
|---|---|
|
To-do Description |
Your firm's instructions for this request — read this first so you understand exactly what's being asked. |
|
Checklist |
Specific items your firm needs you to address one by one. Not every To-do has a checklist — some are simple document requests with no checklist at all. |
|
Documents |
Where you upload supporting files, if your firm has requested any. Only appears when your firm has enabled it for this To-do. |
|
Conversation |
A running message thread with your firm about this specific To-do (right panel). |
You'll also see the To-do's Priority (Low, Medium, or High) and Due Date, these tell you how urgent the request is and by when your firm needs your response.
3. Completing Checklist Items
If a To-do includes a checklist, it's broken into one or more sections, each containing individual items your firm needs you to address.
Every checklist item is marked complete the same way: select Mark as Applicable (✓) if it applies to you, or Mark as Not Applicable (✗) if it genuinely doesn't. What differs between items is whether you also need to type, select, or upload something alongside that choice.
|
What You'll See |
What To Do |
|---|---|
|
A plain item with just the ✓ / ✗ toggle |
Simply mark it Applicable or Not Applicable — no further input needed. |
|
A dropdown list |
Click it and select the one option that best matches your situation. |
|
A list of checkboxes |
Select every option that applies — you can select more than one. |
|
A text box |
Type your answer in your own words. |
|
A number field |
Enter the numeric value your firm is asking for. |
Some items are marked with an asterisk (*) next to their name, these are mandatory. You will not be able to submit the To-Do until every mandatory item has been marked Applicable or Not Applicable.
Tip: If you're not sure how to answer a specific checklist item, use the Conversation thread (right panel) to ask your firm before submitting — it's much easier for them to clarify a question up front than to sort out an incomplete submission afterward.
Note: You can upload a file directly on an individual checklist item using the attachment icon on that item, if your firm has asked for a document specific to that item — separately from any general Documents section for the To-Do overall.
4. Uploading Documents
If your firm needs general supporting documents - separate from any files tied to a specific checklist item - you'll see a Documents section in the left panel. This won't appear on every To-do; it only shows up when your firm has turned it on for that particular request.
To upload a file:
1. Open the Documents section of the To-do (left panel).
2. Click the upload area, or drag and drop your file into it.
3. Wait for the upload to finish — the file will appear in the list with its name, size, and upload date.
|
Rule |
Detail |
|---|---|
|
Maximum file size |
5 MB per file. |
|
Accepted file types |
PDF, JPEG, PNG, Excel, Word, and PowerPoint files. |
If the Documents section header shows an asterisk (*), at least one document upload is required before you can submit the To-do.
Limitation: Files larger than 5 MB or in a format outside the accepted list cannot be uploaded. If your file doesn't fit these limits, try compressing it or splitting it into smaller files, or reach out to your firm through the Conversation thread for guidance.
5. Using the Conversation Thread
The right panel contains the Conversation thread - a message thread between you and your firm about this specific To-do. Use it to ask questions, provide extra context, or flag something that doesn't fit neatly into a checklist item or document upload.
How the Conversation Works
When you or your firm posts the first comment in the conversation, a Post is created automatically. Here's what that means for you:
-
The Post is pre-filled with the To-Do description so your firm always has context for the conversation.
-
Your comment — and all comments that follow — are part of the same Post.
-
The conversation panel shows a Post label so you know it's connected to your firm's messaging system.
-
Your firm can find this conversation under their Client Messages area, and you can find it in your Messages section — both outside of the To-Do itself.
6. Submitting a To-do
Once you've worked through the checklist and uploaded any required documents, you're ready to submit. Click the Mark as Complete button on the To-Do — it is always active and never greyed out.
When you click Mark as Complete, one of two things will happen:
- If everything is complete — a confirmation message appears letting you know everything looks good. Click Submit to send your To-Do back to your firm.
- If something mandatory is still outstanding — a message appears listing exactly what still needs to be done, whether that's a checklist item that hasn't been marked yet or a required document that hasn't been uploaded. Select the link in the message to go directly to the relevant section, complete it, then click Mark as Complete again.
Once submission succeeds, you'll see a confirmation screen.
7. After You Submit
Once submitted, the To-do moves to Submitted status and is sent back to your firm for review. You can still open it at any time to see everything you provided, and the Conversation thread remains available if you need to add anything or your firm has a follow-up question. Once your firm marks the To-do as Done, the To-do becomes fully read-only — you can still view it and everything you submitted, but you will no longer be able to post to the conversation or upload additional documents.
If your firm reviews your submission and finds something needs correcting or adding, they may reopen the To-do; it will move back to Assigned so you can make changes and submit again. If that happens, they'll typically leave a note in the Conversation thread explaining what's needed.
Note: When your firm sends you a new To-do, it appears on your portal dashboard, and you'll also receive an email notification.
8. Frequently Asked Questions
Do I have to fill out every checklist item?
Only items marked with an asterisk (*) are mandatory. You must mark every mandatory item Applicable or Not Applicable before you can submit. Non-mandatory items can be marked as they apply to you.
Can I upload a document without it being tied to a checklist item?
Yes, if the To-do has a Documents section — use that for general supporting files. Some checklist items also let you attach a document directly to that item using the attachment icon on the item.
Does sending a message in the Conversation thread count as submitting the To-Do?
No. Messaging your firm and submitting the To-do are two separate actions. You must click Mark as Complete to actually submit.
What happens if I try to submit before finishing everything mandatory?
A message will appear listing exactly which items are still outstanding — a checklist item that needs to be marked, or a required document that hasn't been uploaded. Select the link to go directly to that section, complete it, and then click Mark as Complete again.
Can I still see a To-do after I've submitted it?
Yes. Open it any time from your dashboard to review what you provided or to continue the conversation with your firm.
What happens once my firm marks a To-Do as Done?
The To-Do becomes fully read-only. You can still open it and see everything you submitted, but you will no longer be able to post to the conversation or upload additional documents.
What file types and sizes can I upload?
PDF, JPEG, PNG, Excel, Word, and PowerPoint files, up to 5 MB each.
My firm says they sent me a To-do, but I don't see it. What should I do?
Check your dashboard directly. If it still doesn't appear, the To-Do may still be in preparation on your firm's end - contact your firm directly to confirm it was sent to you.
Need More Help?
Contact your firm through the Messages feature in the Client Portal.